Finished Quilt: Hats Off To You
Hello everybody!
This is a story of a quilt that I have not only completely finished, but am exhibiting at the Festival of Quilts in Birmingham!


I spent the next two days making more paper templates and starting to baste them. I had initially assumed that all the tiles were identical in every way, but once I had several basted and tried to tile them, it quickly became clear that some tiles were in fact mirrored.


At this point, I was only thinking I would make a cushion. But over the coming days and weeks, as I pieced it together, it kept growing, and it was soon clear that it would become a wall hanging quilt instead.


 |
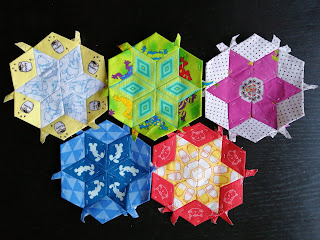
| Auditioning fabrics for the next pieces to be added |
I decided I would appliqué the EPP to a black background. I pulled out the black Makower Spraytime fabric that I am using as a blender in my Halloween La Passacaglia quilt and found I had a large enough piece to use. I used my kitchen table to square up the central panel. This was very awkward. It would actually have been less awkward if I had turned the table upside down and put it on top of the quilt and then cut around it. How do people square up large quilt panels? It's not like everyone has perspex squares 3ft on each side or more lying around.

 |
| The middle section of the table is the size I was cutting it to. |
It was about at this point in time I decided I would enter the quilt into the Festival of Quilts. From then on it was a race to finish it by the deadline. The minimum size requirement is 1m on one side. After squaring up the central panel I was about 5cm short of the size requirements. I thought aesthetically it needed a blue border anyway, I used a starry blue Libs Elliott fabric as this was the only fabric
I had been using that I actually had more than a fat quarter of. The brightness works well in contrast to the black, in my opinion. I also added a thin black border to help bring it up to the size requirements. It finished at about 106cm square.
I had been using that I actually had more than a fat quarter of. The brightness works well in contrast to the black, in my opinion. I also added a thin black border to help bring it up to the size requirements. It finished at about 106cm square.

So then on to the quilting! This really was rushed. I had declared it would be hand quilted on the FOQ entry form so that's what I had to, and honestly, it's what I am most comfortable doing even if it does take more time. I opted to quilt in the ditch around the EPP pieces and to continue the tessellating pattern around the appliquéd portion. I used a blue thread as I wanted the quilting to be clearly visible.
 |
| Quilting in the ditch in action |
I was finding continuing the pattern tricky at this point. When I had chosen part of the picture to copy, I had never intended it to get this big, and I had gone off the edges of the example I was working from. And with the pattern being aperiodic and me having chosen a random place to start there was no way to work out how to generate much more of the tiling pattern except through trial and error. For this reason, and the time crunch, I only ended up quilting one 'circle' of tiles around the appliquéd portion instead of filling the whole plane as I'd originally intended.

And lastly the binding. Because this was going to be a show quilt, I thought I should actually make bias binding instead of cutting it on the grain like I usually do. I tried using a Mx Domestic tutorial for creating a single continuous strip of bias binding. They used a fat quarter whereas I used close to a half metre and I must have got something slightly out, because I didn't get one strip, I got eight long strips. Still, that was better than the 20-odd strips I would have got cutting it traditionally so I am happy.
 |
| Pretty sure I was still getting it right at this stage in the bias binding making process |
It's also way more than I needed - 3 of those strips were enough to bind the quilt. So now I have a ton of leftover black bias binding I need to find a use for. Maybe there's some Celtic knot appliqué in my future.
Attaching the binding went well except for the corners. I did exactly what you are meant to do to get neat mitered corners and I got messy corners. I don't know why. Maybe it's something to do with the way bias binding plays different to straight-cut binding. Anyway, at this point in time I didn't have time to work it out and fix it, so I will just have to accept some pretty harsh judge's comments about that.
And here we go, an actual quilt from conception to completion in 4 months! I will be attending the Festival on the Saturday and Sunday and I am really looking forward to seeing it on display. Go me!

Thanks for reading!


Comments
Post a Comment